AutoUpdater.NET
[删除(380066935@qq.com或微信通知)]

AutoUpdater.NET is a class library that allows .NET developers to easily add auto update functionality to their classic desktop application projects.
The NuGet Package
PM> Install-Package Autoupdater.NET.OfficialSupported .NET versions
- .NET Framework 4.5 or above
- .NET Core 3.1
- .NET 5.0 or above
This library only works for WinForms or WPF application projects.
How it works
AutoUpdater.NET downloads the XML file containing update information from your server. It uses this XML file to get the information about the latest version of the software. If the latest version of the software is greater than the current version of the software installed on User's PC then AutoUpdater.NET shows update dialog to the user. If user press the update button to update the software then It downloads the update file (Installer) from URL provided in XML file and executes the installer file it just downloaded. It is a job of installer after this point to carry out the update. If you provide zip file URL instead of installer then AutoUpdater.NET will extract the contents of zip file to application directory.
Using the code
XML file
AutoUpdater.NET uses XML file located on a server to get the release information about the latest version of the software. You need to create XML file like below and then you need to upload it to your server.
<?xml version="1.0" encoding="UTF-8"?>
<item>
  <version>2.0.0.0</version>
  <url>https://rbsoft.org/downloads/AutoUpdaterTest.zip</url>
  <changelog>https://github.com/ravibpatel/AutoUpdater.NET/releases</changelog>
  <mandatory>false</mandatory>
</item>
There are two things you need to provide in XML file as you can see above.
version (Required) : You need to provide latest version of the application between version tags. Version should be in X.X.X.X format.
url (Required): You need to provide URL of the latest version installer file or zip file between url tags. AutoUpdater.NET downloads the file provided here and install it when user press the Update button.
changelog (Optional): You need to provide URL of the change log of your application between changelog tags. If you don't provide the URL of the changelog then update dialog won't show the change log.
mandatory (Optional): You can set this to true if you don't want user to skip this version. This will ignore Remind Later and Skip options and hide both Skip and Remind Later button on update dialog.
- mode (Attribute, Optional): You can provide mode attribute on mandatory element to change the behaviour of the mandatory flag. If you provide "1" as the value of mode attribute then it will also hide the Close button on update dialog. If you provide "2" as the value of mode attribute then it will skip the update dialog and start downloading and updating application automatically.
<mandatory mode="2">true</mandatory>
- minVersion (Attribute, Optional): You can also provide minVersion attribute on mandatory element. When you provide it, Mandatory option will be triggered only if the installed version of the app is less than the minimum version you specified here.
<mandatory minVersion="1.2.0.0">true</mandatory>
args (Optional): You can provide command line arguments for Installer between this tag. You can include %path% with your command line arguments, it will be replaced by path of the directory where currently executing application resides.
checksum (Optional): You can provide the checksum for the update file between this tag. If you do this AutoUpdater.NET will compare the checksum of the downloaded file before executing the update process to check the integrity of the file. You can provide algorithm attribute in the checksum tag to specify which algorithm should be used to generate the checksum of the downloaded file. Currently, MD5, SHA1, SHA256, SHA384, and SHA512 are supported.
<checksum algorithm="MD5">Update file Checksum</checksum>Adding one line to make it work
After you done creating and uploading XML file, It is very easy to add a auto update functionality to your application. First you need to add following line at the top of your form.
using AutoUpdaterDotNET;Now you just need to add following line to your main form constructor or in Form_Load event. You can add this line anywhere you like. If you don't like to check for update when application starts then you can create a Check for update button and add this line to Button_Click event.
AutoUpdater.Start("https://rbsoft.org/updates/AutoUpdaterTest.xml");Start method of AutoUpdater class takes URL of the XML file you uploaded to server as a parameter.
AutoUpdater.Start should be called from UI thread.
Current version detection
AutoUpdater.NET uses Assembly version to determine the current version of the application. You can update it by going to Properties of the project as shown in following screenshot.
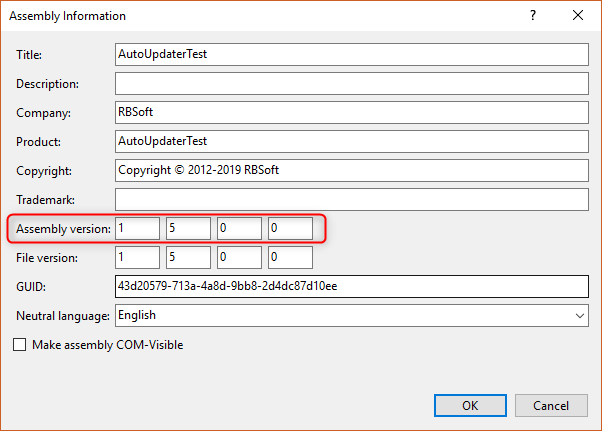
Version specified in XML file should be higher than Assembly version to trigger the update.
If you want to provide your own Assembly then you can do it by providing second argument of Start method as shown below.
AutoUpdater.Start("https://rbsoft.org/updates/AutoUpdaterTest.xml", myAssembly);